1 SETUP
1.0: Make sure you have a GitHub Account (especially if you want to deploy your website)
- If you've completed the "Git/GitHub Workshop", this step is probably already done - just make sure you are logged in to GitHub!
- Create a GitHub Account here: https://github.com/signup
1.1: Pick your poison 🧪
- There are many ways to create your web development environment but we'll be covering 2 ways:
- Code Sandbox (Online)
- Local Code Editor (Offline)

1.2: Setup your coding environment
1.2a Code Sandbox (Online)
- Go to the codesandbox.io Website Click on "Sign in with GitHub" when prompted
- Go back to Step 1.0 if you don't have a GitHub account
- We are using GitHub to sign in so we can copy the sandbox as a repository later on, which will then allow us to use GitHub Pages to deploy the website
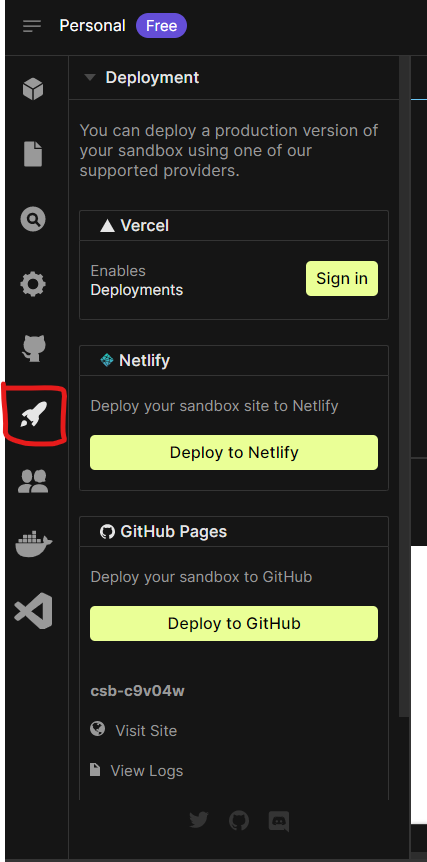
Other Deployment Options for Code Sandbox
It is worth noting that Code Sandbox also offers other deployment options that are relatively easy and straightforward as well.

1.2b Local Development (Offline)
Download VSCode
- other code editors can also be used, though this workshop will focus on VSCode
Download Node.js and npm (allows us to run JavaScript locally)
Download Git
Download Extensions (technically optional but highly recommended for a better developer experience):
Clone the starter code from the [
starterbranch] of the Workshop's- You can use VSCode's GUI:
Ctrl/Cmd + Shift + P-->Git: Clone--> put in the starter branch url: https://github.com/HackMelbourne/todo-list-workshop.git - or the command line command:
git clone https://github.com/HackMelbourne/todo-list-workshop.gitHow to create the starter code on your own
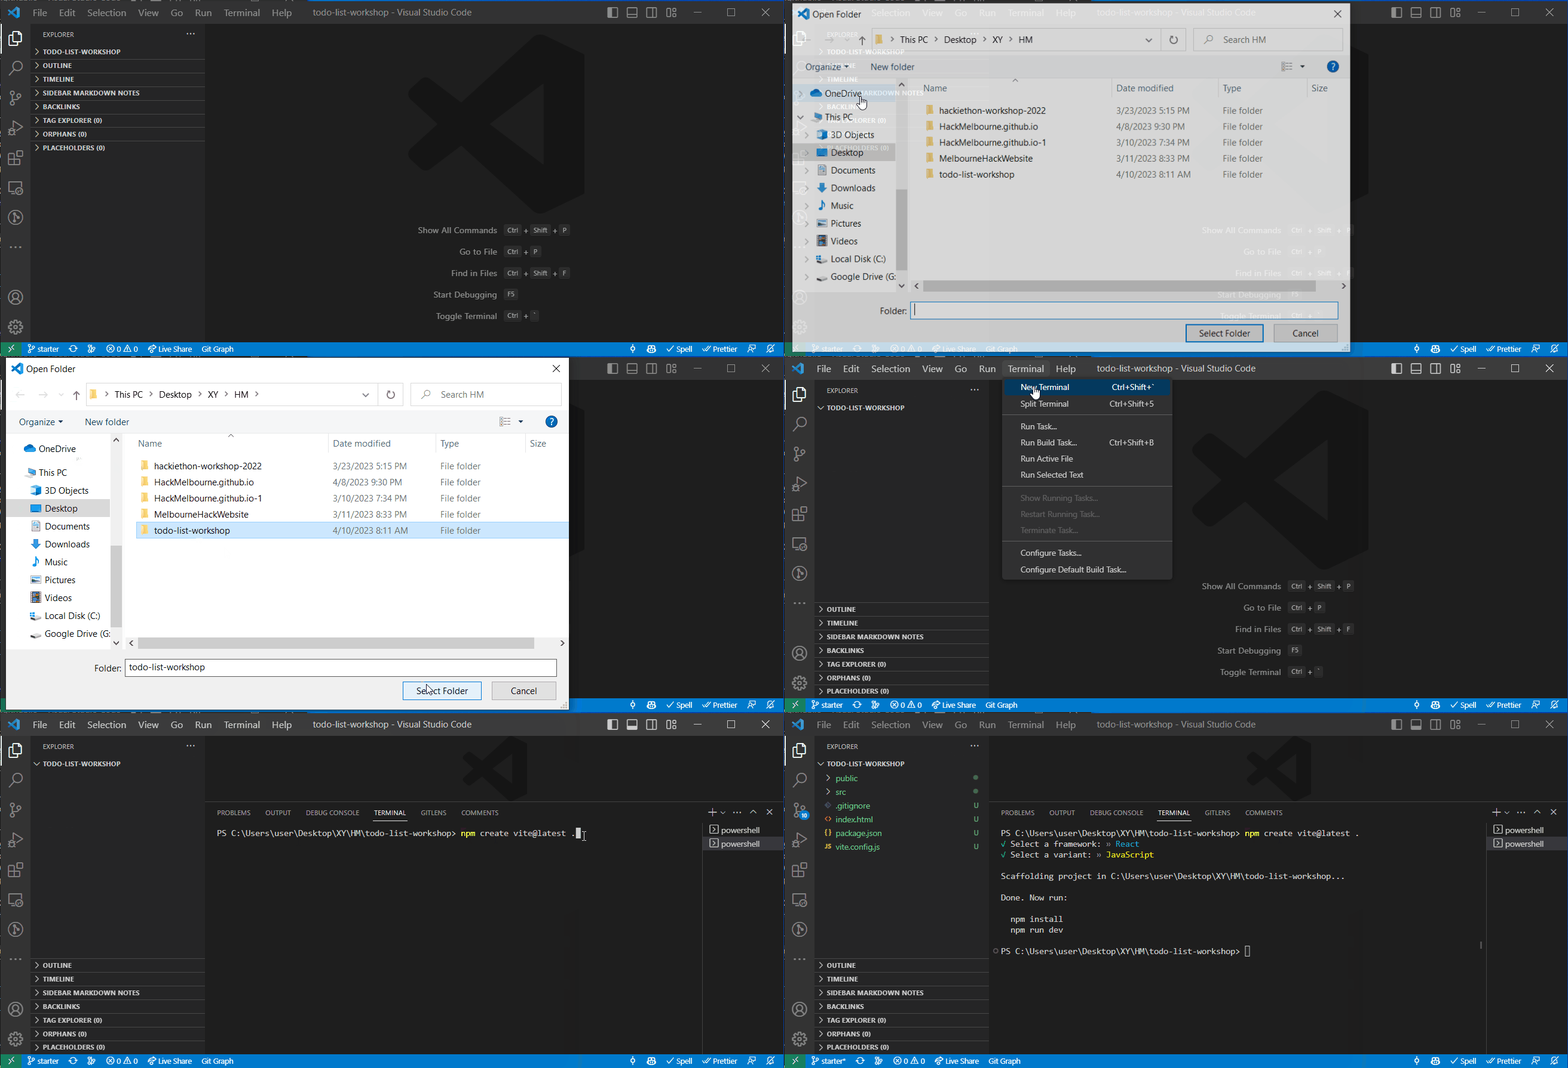
The starter code was generated using the Vite CLI tool, if you would like to create another project from scratch later on, you can either start with the starter code or use the Vite CLI tool to create the starter code from an empty project.
Open a new empty folder (to store your project) and run the following command to run Vite's command line tool
npm create vite@latest .- Select
Reactas your framework - Select
JavaScriptas your variant - This should generate a few files into your directory

After running this, we've cleared all content in
index.cssandApp.css(we'll write our own CSS later). And made some minor changes toApp.jsxwhich you can find below.- You can use VSCode's GUI:
Run
npm installnpm install- this will install all of the necessary packages for a basic React app
- the installed packages will be stored in the
node_modulesfolder (it will automatically just pop into your current project)
If this is your first time using git, you'll have to setup your Git Configs
// Type this in your Terminal or Git Bash

// Setup your username
git config --global user.name "John Doe"

// Setup your password
git config --global user.email johndoe@example.com
And depending on your repository's privacy settings, you might have to setup your GitHub credentials
2 Ingredients for the Web
CodePen Home HTML, CSS, JavaScript, React Bulb Example by Cindy
2.1 HTML
https://www.w3schools.com/html/default.asp
2.2 CSS
https://www.w3schools.com/css/
2.3 JavaScript
https://www.w3schools.com/js/
3 BUILDING THE TO-DO LIST APP
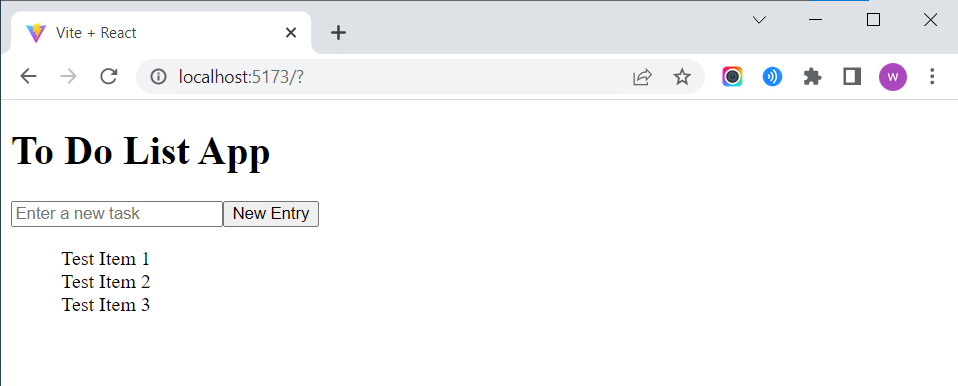
This is what we'll be creating
3.1 Creating a React Project with Vite
- Once all the setup from Step 1 and 3.1 are done, you should have a basic Vite Project
- Vite is a tool that helps you build and run web applications faster and more efficiently, making it easier to develop modern web projects using popular JavaScript frameworks
3.1a If You're using Local Development
- Make sure you've either cloned the
- Run
npm installnpm install- this will install all of the necessary packages for a basic React app - the installed packages will be stored in the
node_modulesfolder (it will automatically just pop into your current project)
- Run
npm run devto run the development servernpm run dev
3.1b If You're using CodeSandbox
- Fork this Sandbox
3.2 Intro to React
- Let's start out by understanding the basic structure of a component in React:
import "./App.css";

function App() {
  return (
    <div className="App">
      <h1>To Do List</h1>
    </div>
  );
}

export default App;

3.3 Writing the HTML
import "./App.css";

function App() {
  return (
    <div className="App">
      <h1>To Do List App</h1>
      <form>
        <input placeholder="Enter a new task"></input>
        <button type="submit">New Entry</button>
      </form>
      <ul>
        <li>Test Item 1</li>
        <li>Test Item 2</li>
        <li>Test Item 3</li>
      </ul>
    </div>
  );
}

export default App;

3.4 React States with useState
- We'll be storing To Do Items as JavaScript Objects in an array
// To Do Item Structure
{
  id: 1,              // integer
  title: "Buy Milk",  // string
  done: false,        // boolean
},
import "./App.css";

function App() {
  const [todos, setTodos] = useState([
    {
      id: 1,
      title: "Buy Milk",
      done: false,
    },
    {
      id: 2,
      title: "Call Alistair",
      done: false,
    },
  ]);

  return (
    <div className="App">
      <h1>To Do List App</h1>
      <form>
        <input placeholder="Enter a new task"></input>
        <button type="submit">New Entry</button>
      </form>
      <ul>
        {todos.map((task, i) => (
          <li key={task.id}>
            {i + 1}. {task.title}
          </li>
        ))}
      </ul>
    </div>
  );
}

export default App;
3.4a Adding A Checkbox and Trash Can
// In App.jsx, replace the <ul> and <li>s with....

<ul>
  {/* Map over the todos state array and render a list item for each todo */}
  {todos.map((task, i) => (
    <li key={task.id} className={task.done ? "done" : ""}>
      <input type="checkbox" />
      <span className="title">
        {i + 1}. {task.title}
      </span>
      <button>🗑️</button>
    </li>
  ))}
</ul>
3.5 JavaScript Functions
3.5a createTodo
To create a task, the user enters the title of the new task into the text box and clicks on the "New Task" button.
We first have to be able to get the input values from the text <input> element. We do this by
Next, we have to handle the form submission. When the "New Task" button is clicked, it submits the <form> (because we set the type="submit" attribute for that button). We can control what happens when the form is submitted by passing in a function to the onSubmit event handler.
<form
  onSubmit={(e) => {
    // Prevent the default form submission behaviour (which reloads the page)
    e.preventDefault();

    // Check if the user's input is empty
    if (title === "") {
      alert("Cannot add an empty task");
      return;
    }

    // Create the todo
    createTodo(title);

    // Empty the input textbox
    setTitle("");
  }}
>
We call a function called createTodo(), let's define that function
// In App.jsx, within the App() function, before the return
...
  // Define function to create a new todo item
  const createTodo = (title) => {
    const lastTodoId = todos.length > 0 ? todos[todos.length - 1].id : 0;
    const newTodo = {
      id: lastTodoId + 1,
      title: title,
      done: false,
    };
    // Add newTodo to the todos state array using setTodos
    setTodos([...todos, newTodo]);
  };
...
3.5b toggleDone
Let's add the functionality to toggle a task's done property when a user clicks on a task's checkbox.
We once again make use of the onChange handler but in the checkbox. When a user clicks on the checkbox, the onChange handler is triggered - let's make it call a function toggleDone(). We should also set the checkbox state to follow the done property by setting the checked attribute accordingly.
<input
  type="checkbox"
  onChange={() => toggleDone(task.id)}
  checked={task.done}
/>
Let's define the function of toggleDone()
// In App.jsx, within the App() function, before the return
...
  // Define function to toggle the 'done' property of a todo item
  const toggleDone = (id) => {
    // Find the index of the todo item with the matching id
    const todoId = todos.findIndex((task) => task.id === id);
    // Toggle the 'done' property of the todo item
    todos[todoId].done = !todos[todoId].done;
    // Update the todos state array using setTodos
    setTodos([...todos]);
  };
...
Adding the strikethrough style to the title of done tasks can be done as follows
/* In App.css */
ul li.done .title {
  text-decoration: line-through;
  color: #bbb;
}
3.5c deleteTodo
We want to delete a todo when the user clicks on the trash button (🗑️). To control what happens when the button is pressed, we can use the onClick event handler - it runs when the user clicks on whatever element the onClick is in. Let's make the <button>s handler call a deleteTodo() function.
<button
  onClick={() => {
    deleteTodo(task.id);
  }}
>
  🗑️
</button>
Let's define the deleteTodo() function as follows
// In App.jsx, within the App() function, before the return
...
  // Define function to delete a todo item
  const deleteTodo = (id) => {
    // Remove the todo item with the matching id from the todos state array
    const updatedTodo = todos.filter((task) => task.id !== id);
    // Update the todos state array using setTodos
    setTodos(updatedTodo);
  };
...
3.5d Local Storage
Great! Now we have the basic functionalities of being able to create, delete and toggle to do tasks. But you will soon realise that when we reload the page, our app does not store our tasks anywhere and refresh back to the default state of todos (an empty array), which basiclly deyeets all of our tasks!
Let's add some functionality to store the tasks within the browser's local storage
// In App.jsx, within the App() function, before the return
...
  // Load todos from localStorage when the component mounts using useEffect hook
  useEffect(() => {
    const savedTodos = JSON.parse(localStorage.getItem("todos"));
    if (savedTodos) {
      setTodos(savedTodos);
    }
  }, []);

  // Save todos to localStorage when the todos state array changes using useEffect hook
  useEffect(() => {
    if (todos.length > 0) {
      localStorage.setItem("todos", JSON.stringify(todos));
    } else {
      localStorage.removeItem("todos");
    }
  }, [todos]);
...
Final Product of HTML and JS
Extension Functions
- Want to extend functionality of your application further? Here are some ideas of features you can add:
- Reorder Items
- Edit Task
- Add Due Dates or Priority Levels to Tasks
- Show To Do List Progress using a progress bar or percentage
- Add a search bar to be able to search for a specific task
Need help? Feel free to ask the Education Team during the workshop 🙋 or ping us on the HackMelbourne Discord!
Making it Pretty with CSS
/* Set the font and background color of the app */
body {
  font-family: Arial, sans-serif;
  background-color: #f2f2f2;
}

/* Center the app container */
.App {
  max-width: 500px;
  margin: 0 auto;
  padding: 30px;
  background-color: white;
  border-radius: 10px;
  box-shadow: 0 0 10px rgba(0, 0, 0, 0.1);
}

/* Style the app title */
h1 {
  text-align: center;
  color: #444;
}

/* Style the form input and button */
form {
  display: flex;
  align-items: center;
  margin-bottom: 20px;
  gap: 10px;
}

form input[type="text"] {
  width: 100%;
  padding: 10px;
  font-size: 16px;
  border: none;
  border-radius: 5px;
  box-shadow: 0 0 5px rgba(0, 0, 0, 0.1);
}

form button[type="submit"] {
  background-color: #4caf50;
  color: white;
  min-width: fit-content;
  padding: 10px 20px;
  border: none;
  border-radius: 5px;
  cursor: pointer;
  transition: background-color 0.2s ease;
}

form button[type="submit"]:hover {
  background-color: #3e8e41;
}

/* Style the todo list */
ul {
  list-style: none;
  margin: 0;
  padding: 0;
}

/* Style the todo items */
ul li {
  display: flex;
  justify-content: space-between;
  align-items: center;
  padding: 10px;
  margin-bottom: 10px;
  background-color: #f9f9f9;
  border-radius: 5px;
  box-shadow: 0 0 5px rgba(0, 0, 0, 0.1);
}

/* Style the todo item label and checkbox */
ul li label {
  display: flex;
  align-items: center;
}

ul li label input[type="checkbox"] {
  margin-right: 10px;
}

/* Style the todo item title */
ul li .title {
  padding-left: 1rem;
  flex-grow: 1;
}

ul li.done .title {
  text-decoration: line-through;
  color: #bbb;
}

/* Style the todo item delete button */
ul li button {
  background-color: #f44336;
  color: white;
  padding: 5px 10px;
  border: none;
  border-radius: 5px;
  cursor: pointer;
  transition: background-color 0.2s ease;
}

ul li button:hover {
  background-color: #d32f2f;
}